Man in the Middle Access Point
October 20, 2023
I was curious about what a phone does behind the scene when it has a wifi connection. In this post I will go step by step on how to turn a wifi card into an access point and how to setup DHCP, DNS, routing and firewall rules to make a computer into a man in the middle box.
There are no hacks, spoofing or poisoning. I will go just through the happy case when I control the target device. Despite of this, it was a interesting problem to solve.
And when I made the mitm box work and I was celebrating, a careful inspection to the traffic shown a few surprises.
TLDR: all the final configuration files can be found here.
Setup a wireless card as an access point
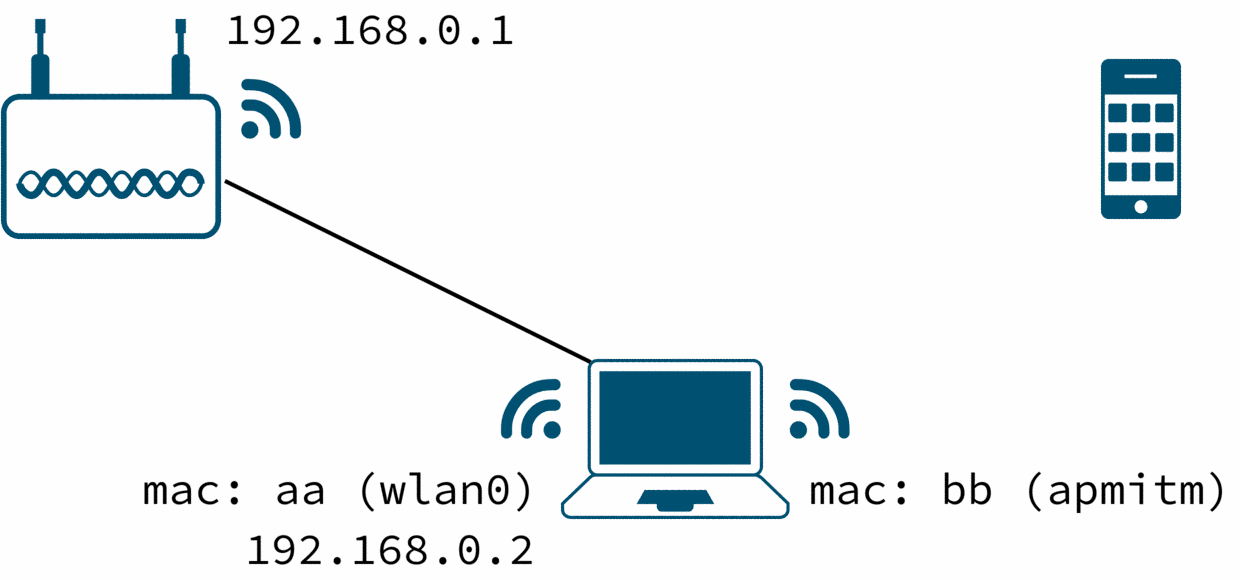
This is the initial setup: a machine with two wireless cards, one (wlan0) connected to an access point on 192.168.0.0/24 network and the other card (apmitm) disconnected.
This machine will serve as the man in the middle between the access point and the target device.
$ ip link show
2: wlan0: <BROADCAST,MULTICAST,UP,LOWER_UP> mtu 1500 qdisc noqueue state UP mode DORMANT group default qlen 1000
    link/ether aa:aa:aa:aa:aa:aa brd ff:ff:ff:ff:ff:ff
3: apmitm: <BROADCAST,MULTICAST> mtu 1500 qdisc noop state DOWN mode DEFAULT group default qlen 1000
    link/ether bb:bb:bb:bb:bb:bb brd ff:ff:ff:ff:ff:ff
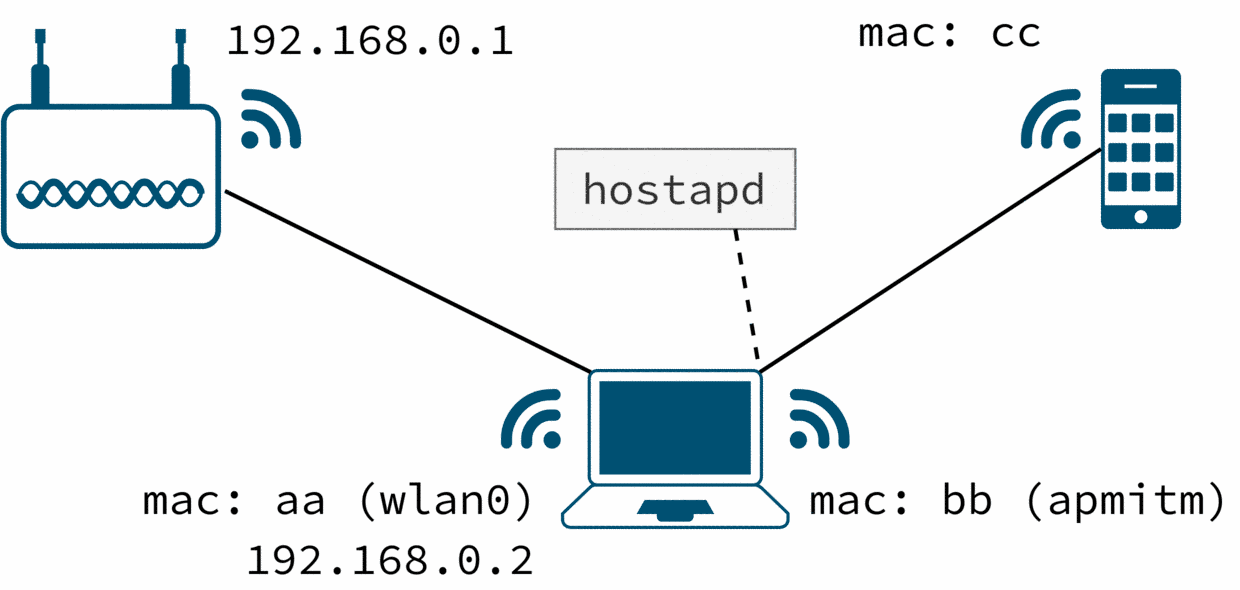
We use hostapd to set our apmitm wireless interface into an access point. The configuration is straight forward:
The parameters should be self-explanatory:
o ssid and channel define the name of the wireless network to setup and in which channel we will be transmitting.
o macaddr_acl allows us filter which clients are allowed to connect to us. This is handy if we want to pinpoint our target.
o auth_algs and wpa configure the encryption. hostapd supports open, wep, wpa and wpa2 (in the example it is set to open)
There are much more parameters but these are the basic.
$ cat hostapd.conf

interface=apmitm

logger_syslog=0
logger_syslog_level=2
logger_stdout=-1
logger_stdout_level=2

ssid=test
channel=1

macaddr_acl=0
auth_algs=1
wpa=0
How to trick the target to connect our access point (apmitm) and not the other one is out the scope for this post. I’m going to assume that you control the target device so you decide which AP to connect to.
$ hostapd hostapd.conf

Configuration file: hostapd.conf
Using interface apmitm with hwaddr bb:bb:bb:bb:bb:bb and ssid "test"
apmitm: interface state UNINITIALIZED->ENABLED
apmitm: AP-ENABLED

apmitm: STA cc:cc:cc:cc:cc:cc IEEE 802.11: authenticated
apmitm: STA cc:cc:cc:cc:cc:cc IEEE 802.11: associated (aid 1)
apmitm: AP-STA-CONNECTED cc:cc:cc:cc:cc:cc
apmitm: STA cc:cc:cc:cc:cc:cc RADIUS: starting accounting session BB24CA4FFFFFFFFF
apmitm but the connection will not hold. So far our setup does not assign any IP address to the target and most of the network managers that may be running in the target will eventually give up and disconnect the device.
You will see something like:
AP-STA-DISCONNECTED cc:cc...
Configure a DHCP and assign IP addresses
Despite the name, dnsmasq can work as DHCP server too. IMO it is a little tricky to setup because dnsmasq will try to bind and server on localhost if it is not explicitly disabled.
Here is the configuration file:
Note how explicit we are: we say the interface name, the IP address where we want to listen, we explicitly say no localhost and we instruct to dnsmasq to bind on the interface that we said (apmitm).
dhcp-range defines the IP set to offer: the syntax is start-address,end-address,network-mask,time-to-leave.
port=0 disables DNS. We will enable it in short.
$ cat dnsmasq-v1.conf
interface=apmitm
listen-address=10.23.0.1
except-interface=lo
bind-interfaces

log-dhcp
no-daemon

dhcp-range=10.23.0.15,10.23.0.88,255.255.255.0,12h

port=0
We assign an IP address to apmitm and we run dnsmasq.
$ ip addr add 10.23.0.1/24 dev apmitm
$ dnsmasq -C dnsmasq-v1.conf

dnsmasq: started, version 2.80 DNS disabled
dnsmasq: compile time options: IPv6 GNU-getopt DBus i18n IDN DHCP DHCPv6
no-Lua TFTP conntrack ipset auth nettlehash DNSSEC loop-detect inotify dumpfile

dnsmasq-dhcp: DHCP, IP range 10.23.0.15 -- 10.23.0.88, lease time 12h
dnsmasq-dhcp: DHCP, sockets bound exclusively to interface apmitm

dnsmasq-dhcp: available DHCP range: 10.23.0.15 -- 10.23.0.88
dnsmasq-dhcp: DHCPDISCOVER(apmitm) cc:cc:cc:cc:cc:cc
dnsmasq-dhcp: tags: apmitm

dnsmasq-dhcp: DHCPOFFER(apmitm) 10.23.0.35 cc:cc:cc:cc:cc:cc
dnsmasq-dhcp: requested options: 1:netmask, 33:static-route, 3:router, 6:dns-server,
dnsmasq-dhcp: requested options: 15:domain-name, 28:broadcast, 51:lease-time,
dnsmasq-dhcp: requested options: 58:T1, 59:T2

dnsmasq-dhcp: next server: 10.23.0.1
dnsmasq-dhcp: sent size:  1 option: 53 message-type  2
dnsmasq-dhcp: sent size:  4 option: 54 server-identifier  10.23.0.1
dnsmasq-dhcp: sent size:  4 option: 51 lease-time  12h

dnsmasq-dhcp: sent size:  4 option:  1 netmask  255.255.255.0
dnsmasq-dhcp: sent size:  4 option: 28 broadcast  10.23.0.255
dnsmasq-dhcp: sent size:  4 option:  3 router  10.23.0.1
dnsmasq-dhcp: available DHCP range: 10.23.0.15 -- 10.23.0.88

dnsmasq-dhcp: DHCPREQUEST(apmitm) 10.23.0.35 cc:cc:cc:cc:cc:cc
dnsmasq-dhcp: tags: apmitm

dnsmasq-dhcp: DHCPACK(apmitm) 10.23.0.35 cc:cc:cc:cc:cc:cc
<...>
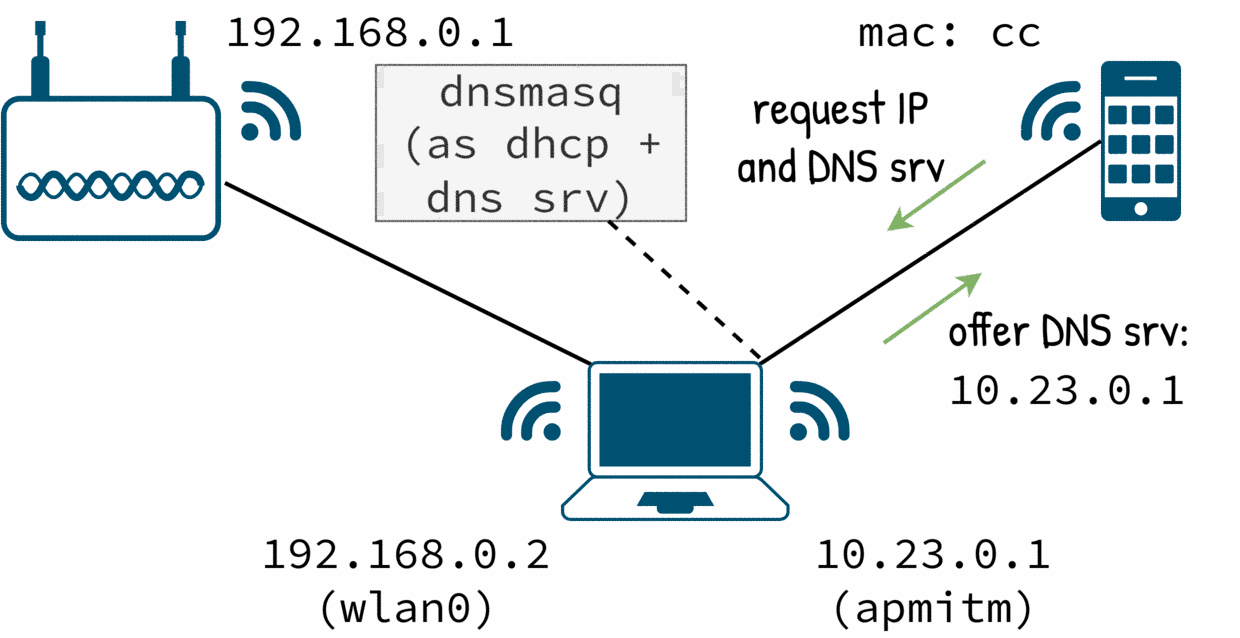
By the moment our dnsmasq only offers an IP address for the target.
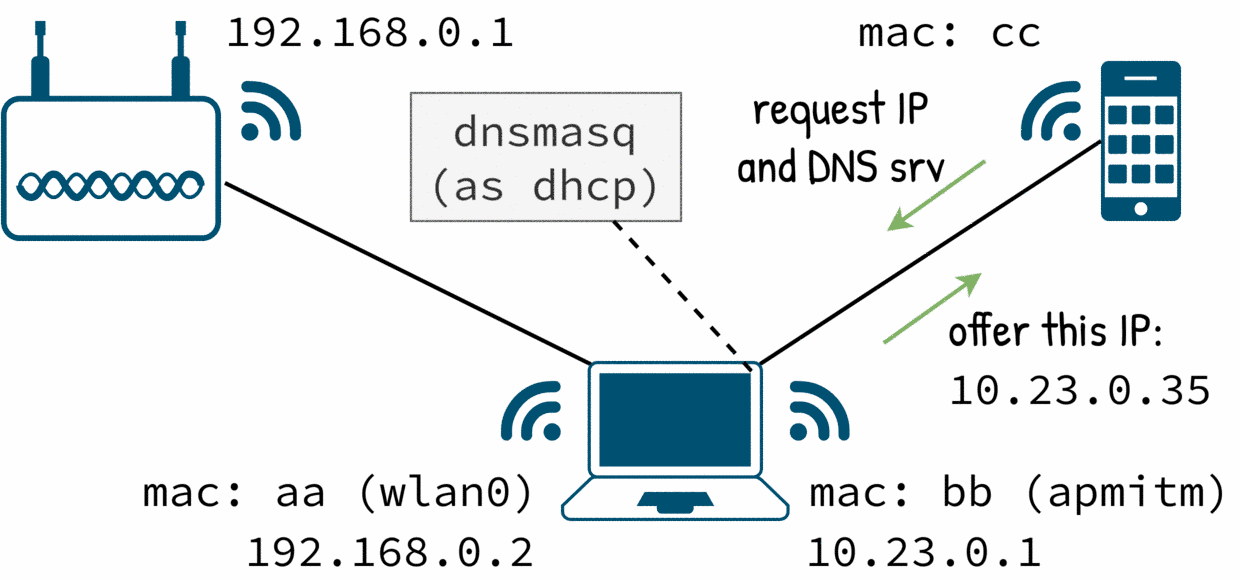
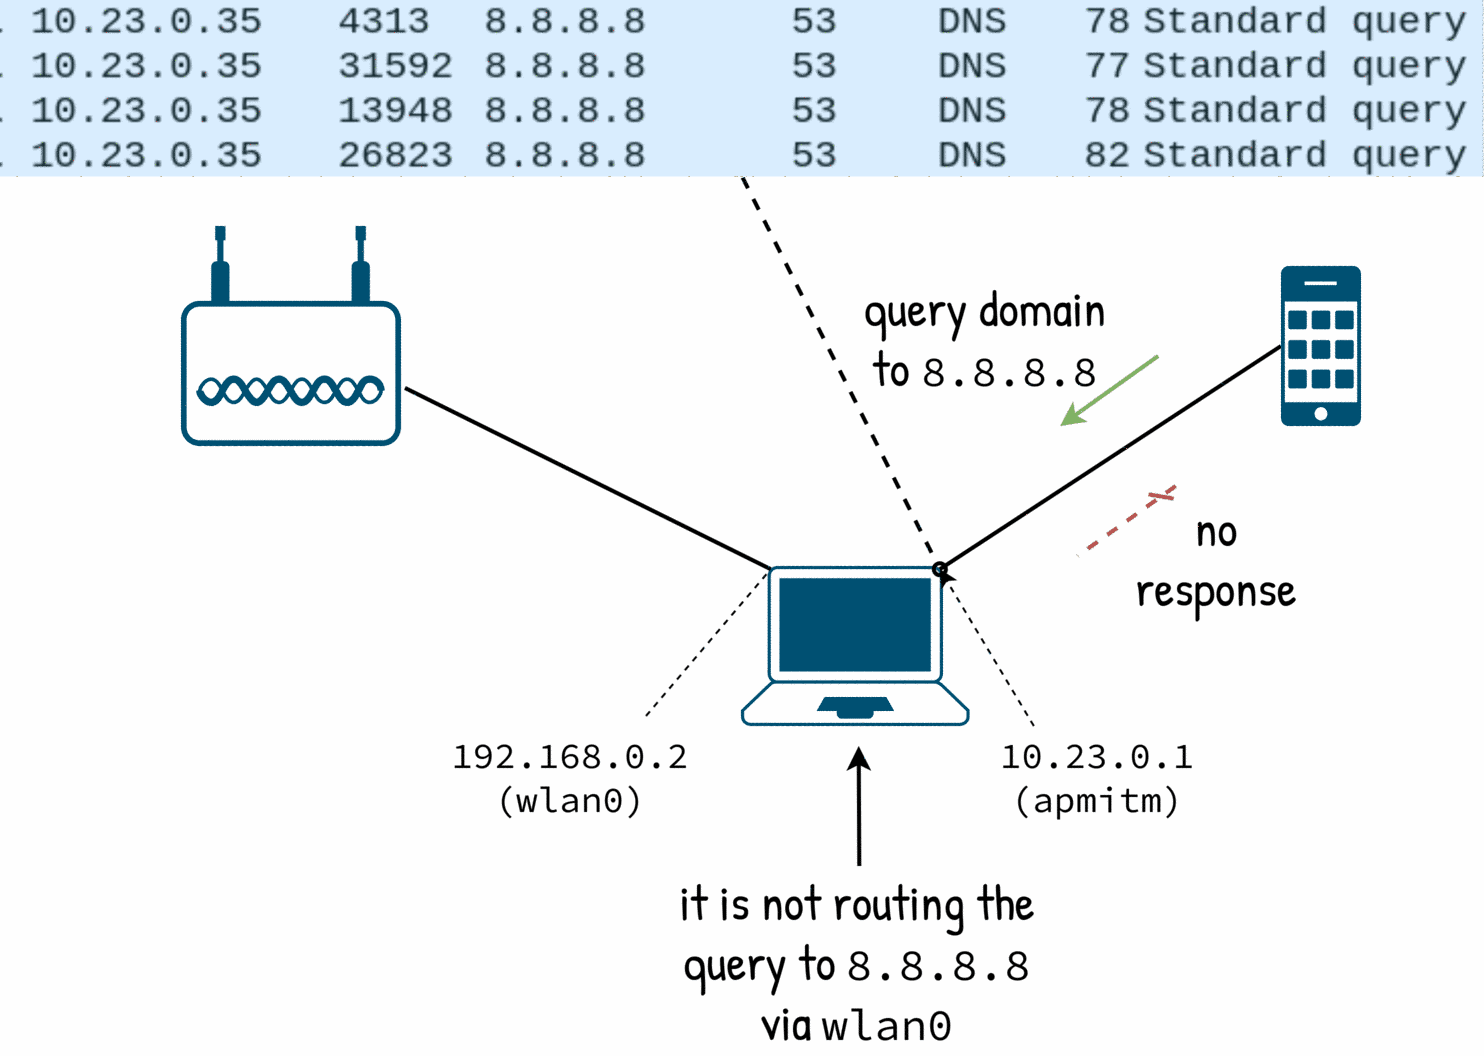
Now the target has an IP but no internet.
dnsmasq is acting as a DNS server to respond them.
The target is connected but it will not have internet.
Configure a DNS server
We can instruct dnsmasq to work as a DNS forwarder just adding a valid port to its configuration. When the target requests an IP from the DHCP, it will also receive the DNS server IP.
$ cat dnsmasq-v2.conf
<...>
port=53
log-queries=extra
Let’s take a look at the dnsmasq logs. The DNS forwarding works but dnsmasq seems to be forwarding the queries to locahost or kind-of, it is forwarding to 127.0.0.53:
<...>
dnsmasq: 3 10.23.0.35/58954 query[A] pool.ntp.org from 10.23.0.35
dnsmasq: 3 10.23.0.35/58954 forwarded pool.ntp.org to 127.0.0.53
dnsmasq: 3 10.23.0.35/58954 reply pool.ntp.org is 162.159.200.123
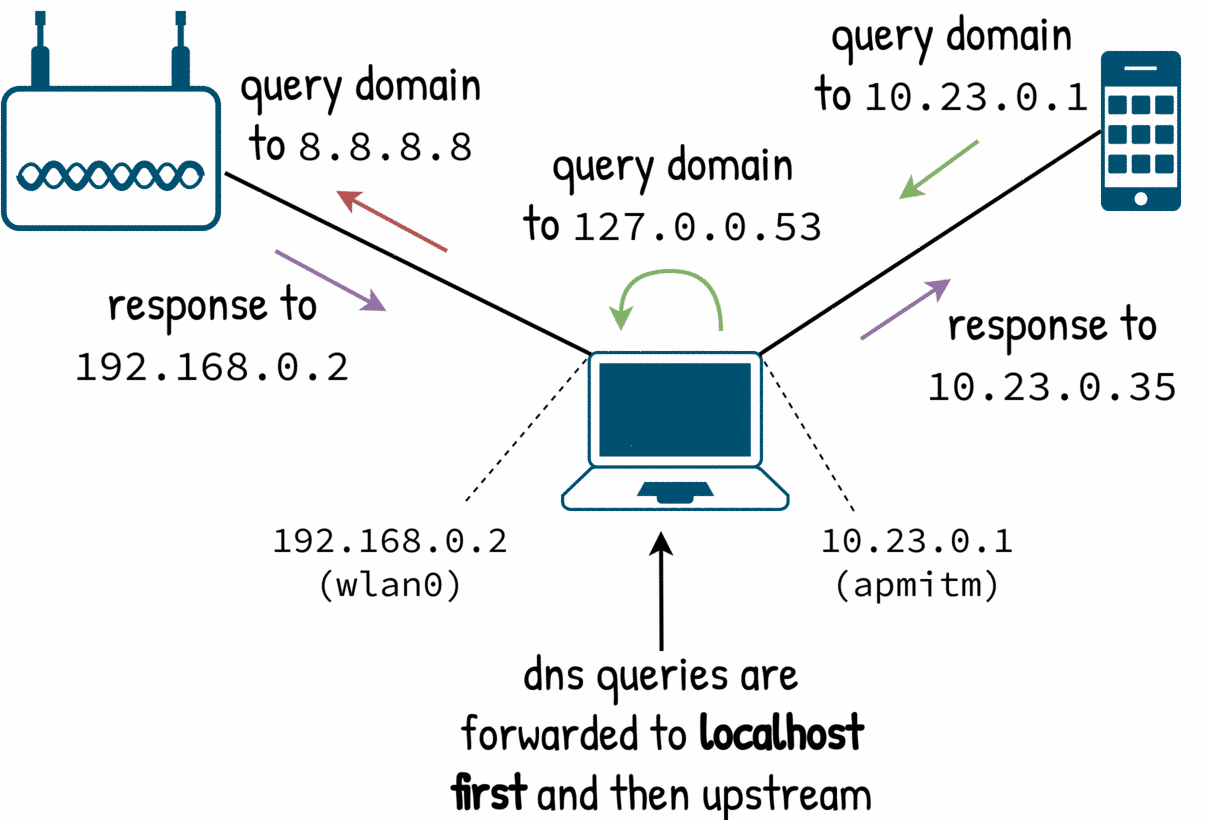
In the logs it is clear why dnsmasq is doing this:
dnsmasq: reading /etc/resolv.conf
dnsmasq: using nameserver 127.0.0.53#53
dnsmasq: read /etc/hosts - 7 addresses
The default is to read /etc/resolv.conf and get the local machine’s upstream nameserver. In my case I’m running a local DNS server in that address. Moreover dnsmasq will server the entries from the local /etc/hosts too.
From dnsmasq perspective this is correct: it was designed to work as a local DNS forwarder for local queries and these defaults make it simple to install.
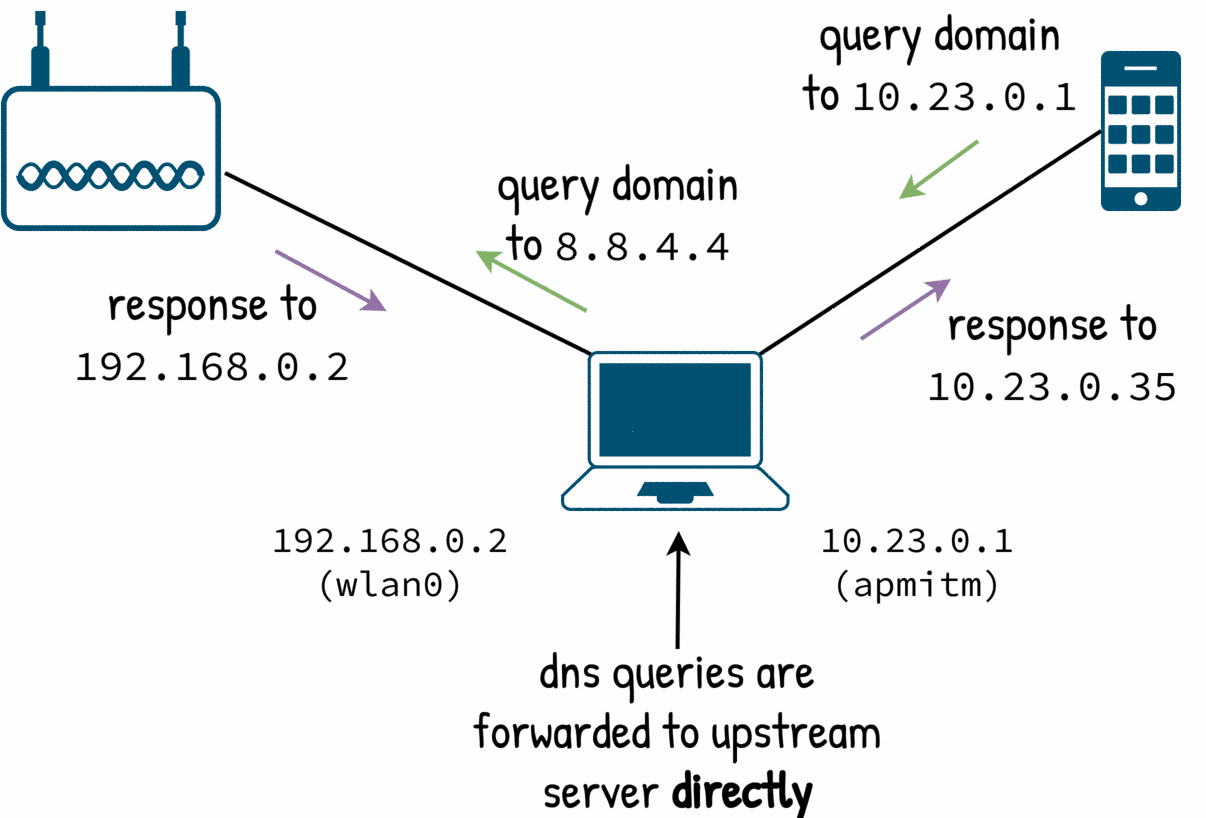
But we don’t want that; we want to have full control of the DNS. Luckly it is just a matter of a few extra options:
With server we say the upstream server and with no-resolv we ensure that dnsmasq will not pick any other.
no-hosts (as you may guess) disables reading /etc/hosts. The domain-needed makes dnsmasq to resolve full domains: queries for local domains are not resolved (think in a local name foo instead of a full domain foo.example.com).
$ cat dnsmasq-v3.conf
server=8.8.4.4

domain-needed
no-hosts
no-resolv
Now the output looks correct:
dnsmasq: 6 10.23.0.35/20969 query[A] pool.ntp.org from 10.23.0.35
dnsmasq: 6 10.23.0.35/20969 forwarded pool.ntp.org to 8.8.4.4
dnsmasq: 6 10.23.0.35/20969 reply pool.ntp.org is 162.159.200.123
Route the target’s packets
Now that we have the DNS working the target is resolving the domains but the TCP connections fail. Our man in the middle is not acting as a router so all the packets not destined to it are dropped.
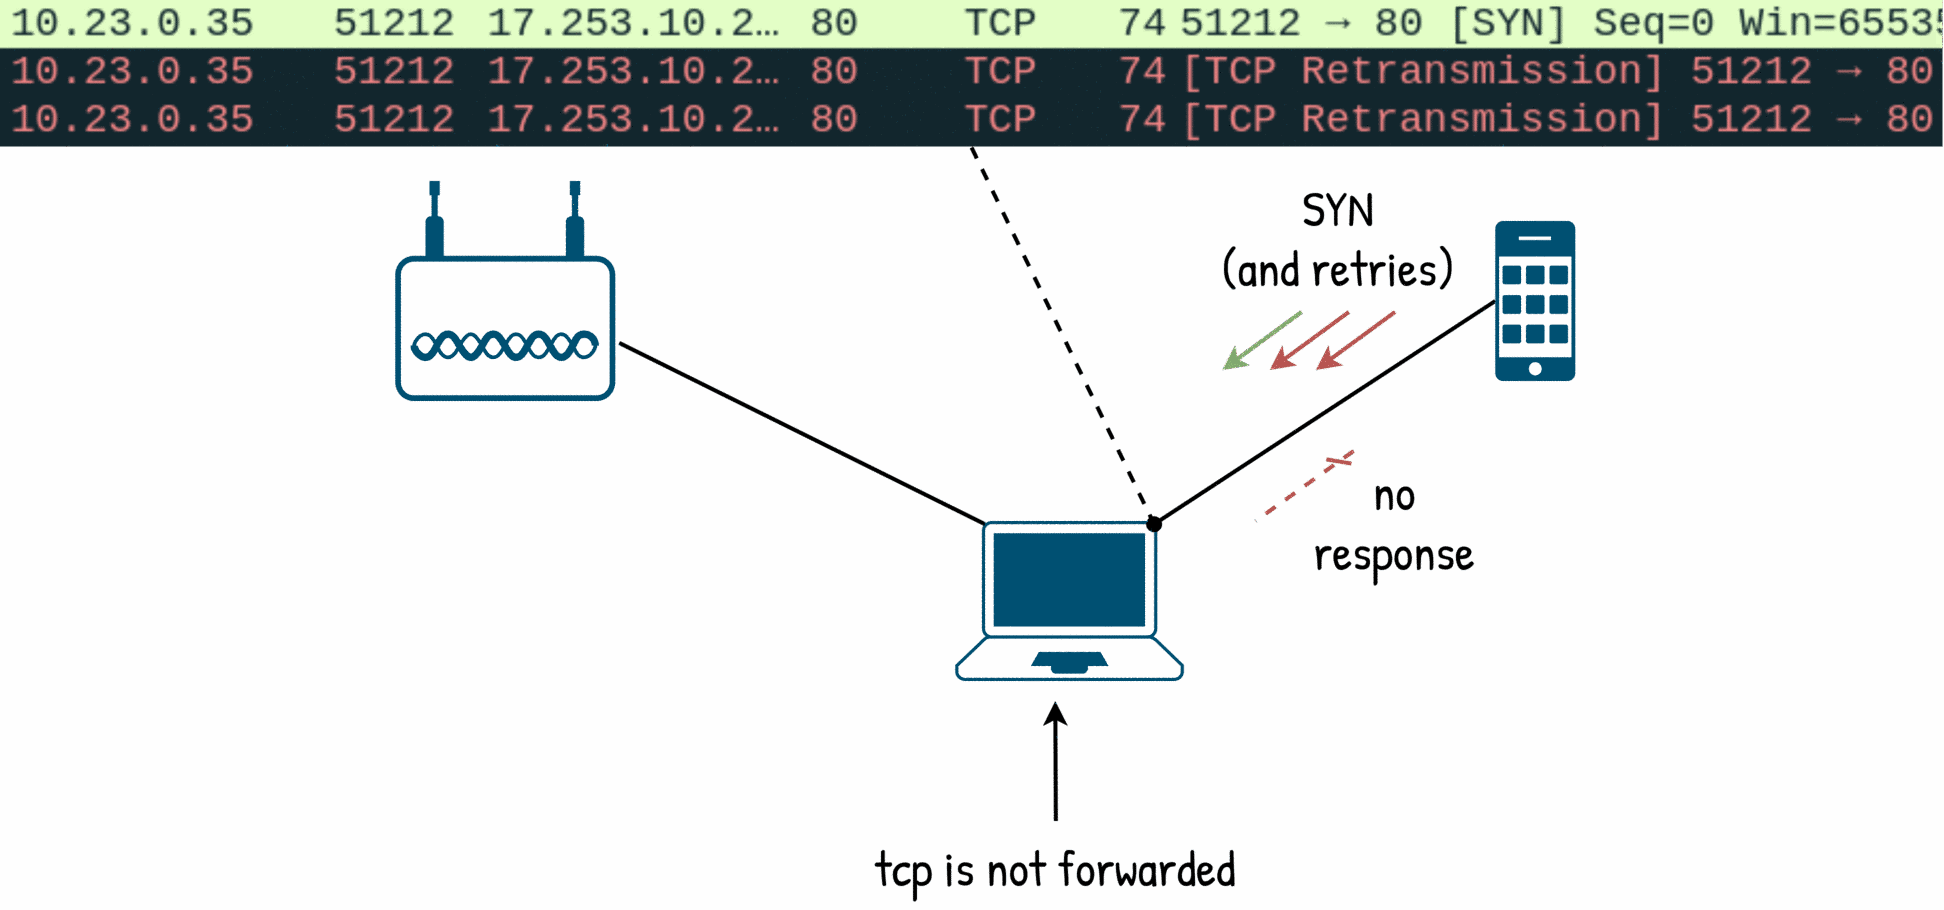
First we need to setup some routes:
- an entry to direct the traffic coming from the target and destined to elsewhere should go to the man in the middle’s gateway
- an entry to direct the traffic back to the targets, but only if it is destined to its network
These two routes should work:
$ ip route show

default via 192.168.0.1 dev wlan0 proto dhcp metric 600
10.23.0.0/24 dev apmitm proto kernel scope link src 10.23.0.1
But it is not enough. Linux will not forward packets by default: we need to allow which packets can be forwarded (via iptables) and tell the kernel that we want to work as a router (with the ip_forward variable)
Route packets from the target
With -P FORWARD DROP we drop any packet unless it is explicitly allowed (we don’t want to forward anything).
The other two rules allow the forwarding only if they come from target’s network (-s 10.23.0.0/24) and from the expected interface (-i apmitm).
$ iptables -P FORWARD DROP
$ iptables -A FORWARD -s 10.23.0.0/24 -p tcp -i apmitm -j ACCEPT
$ iptables -A FORWARD -s 10.23.0.0/24 -p udp -i apmitm -j ACCEPT

$ echo  1 > /proc/sys/net/ipv4/ip_forward
And this works… almost. While the packets from the target are forwarded to the gateway, it is the gateway now that it is dropping the packets.
The gateway expects packets from its network 192.168.0.0/24 and the packets come from the other network 10.23.0.0/24.
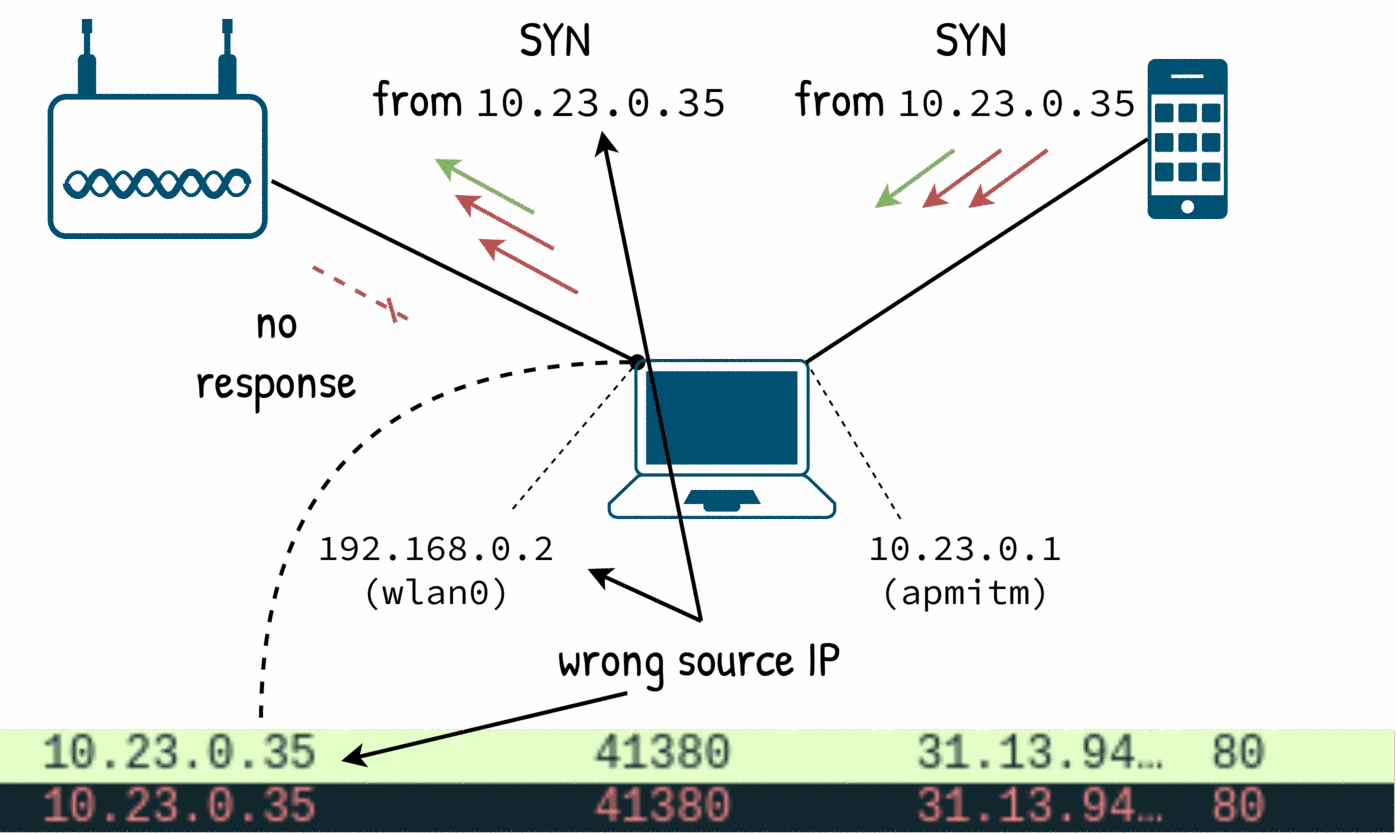
We need to setup a network address translator (NAT) to map any outgoing packet from the other network to the man in the middle’s own address so the gateway will think that the packets come from us.
The magic of NAT is that the packets back to us (with our address) will be reverse-mapped to the original target’s IP.
$ iptables -t nat -A POSTROUTING -s 10.23.0.0/24 -o wlan0 -j MASQUERADE
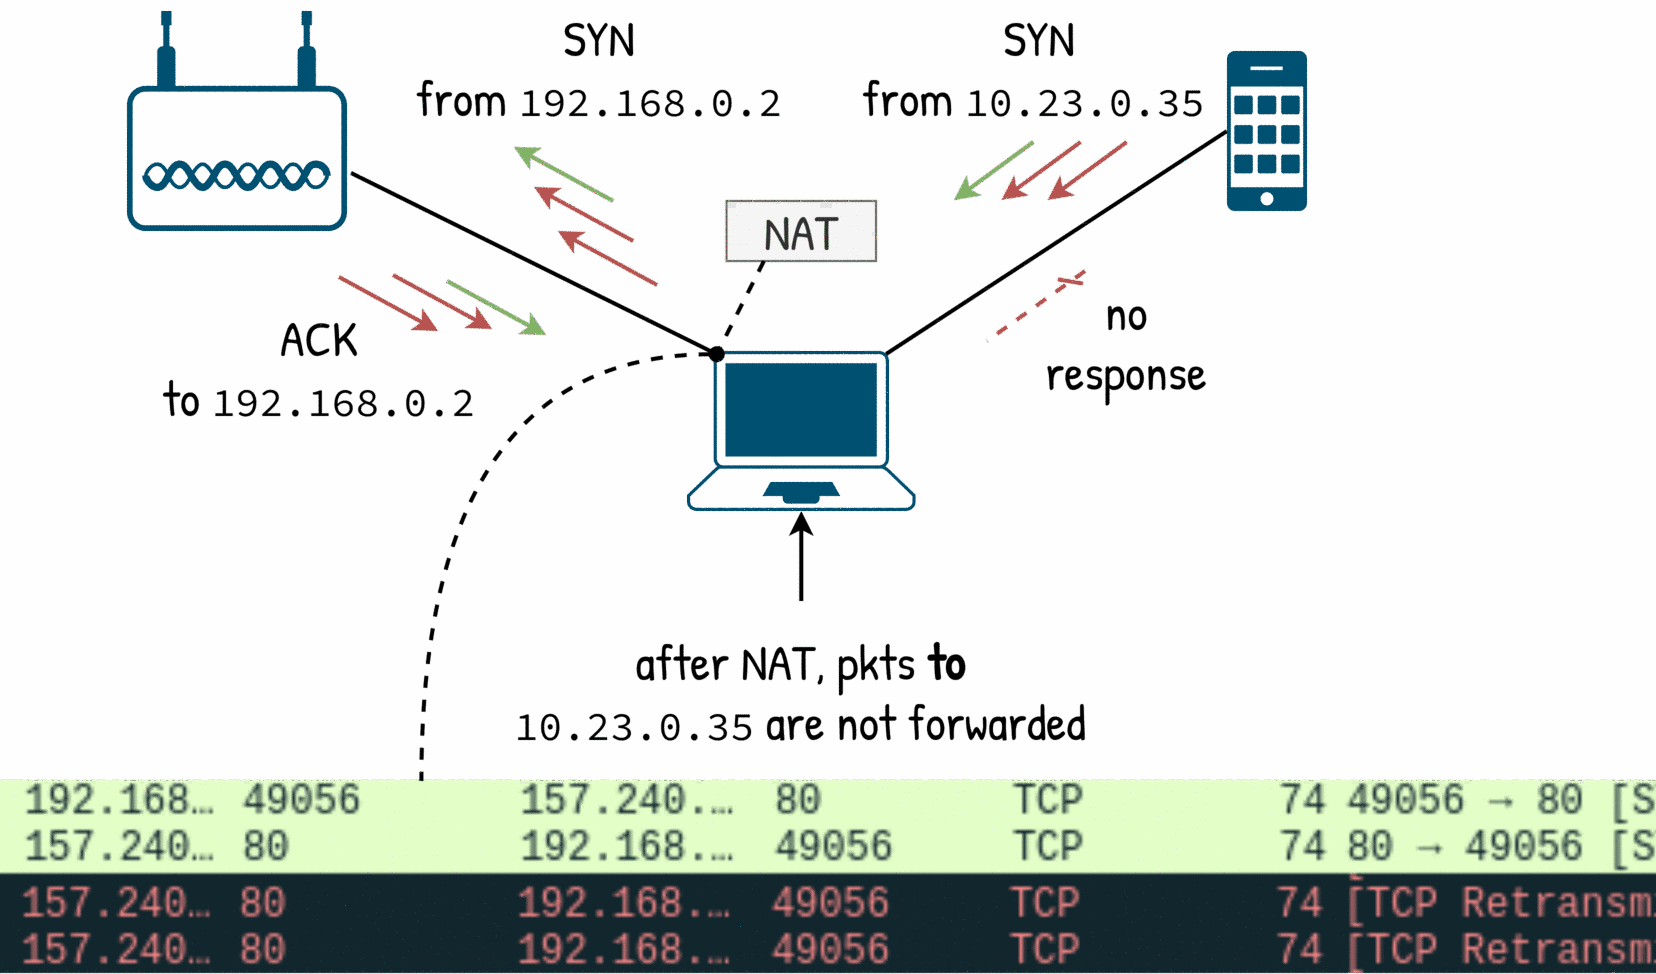
Route packets to the target
Finally, we need two more forwarding rules for packets destined to target’s network:
$ iptables -A FORWARD -d 10.23.0.0/24 -p tcp -i wlan0 -j ACCEPT
$ iptables -A FORWARD -d 10.23.0.0/24 -p udp -i wlan0 -j ACCEPT
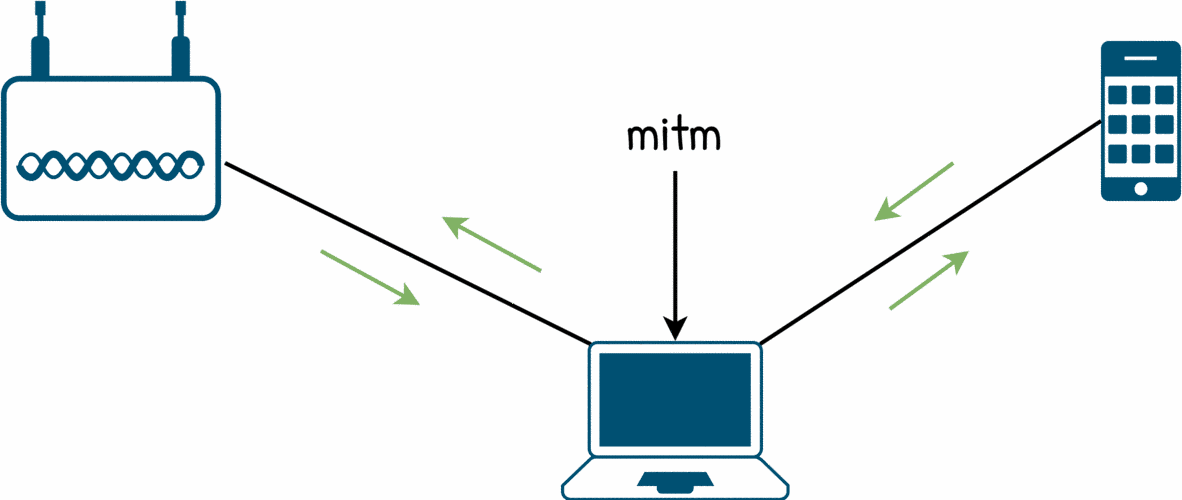
But…
Ensure full control of the DNS
There are two subtle problems that I only spotted sniffing with wireshark:
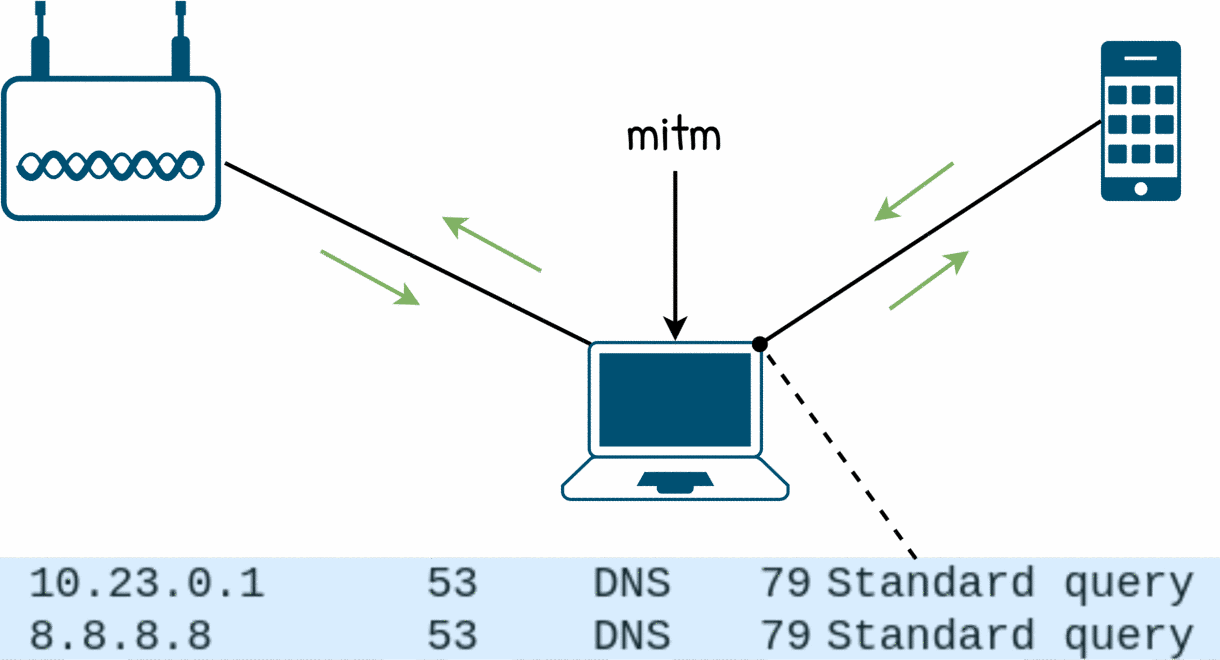
- the target is issuing DNS queries to
8.8.8.8. It seems that the target uses it not just as a fallback but as second opinion (aka “I don’t trust in the DNS server offered by the DHCP so I will use mine”) - the target is also issuing DNS queries of unexpected type.
dnsmasqhas no problem to forward those but it has not capabilities to block them in anyway (so we loose the control of the DNS responses)
8.8.8.8. Why does it work? It is not because dnsmasq is forwarding the queries at the DNS layer but because the man in the middle box is forwarding (routing) the UDP packets.
wireshark does not know about it. It is used for some https stuff.
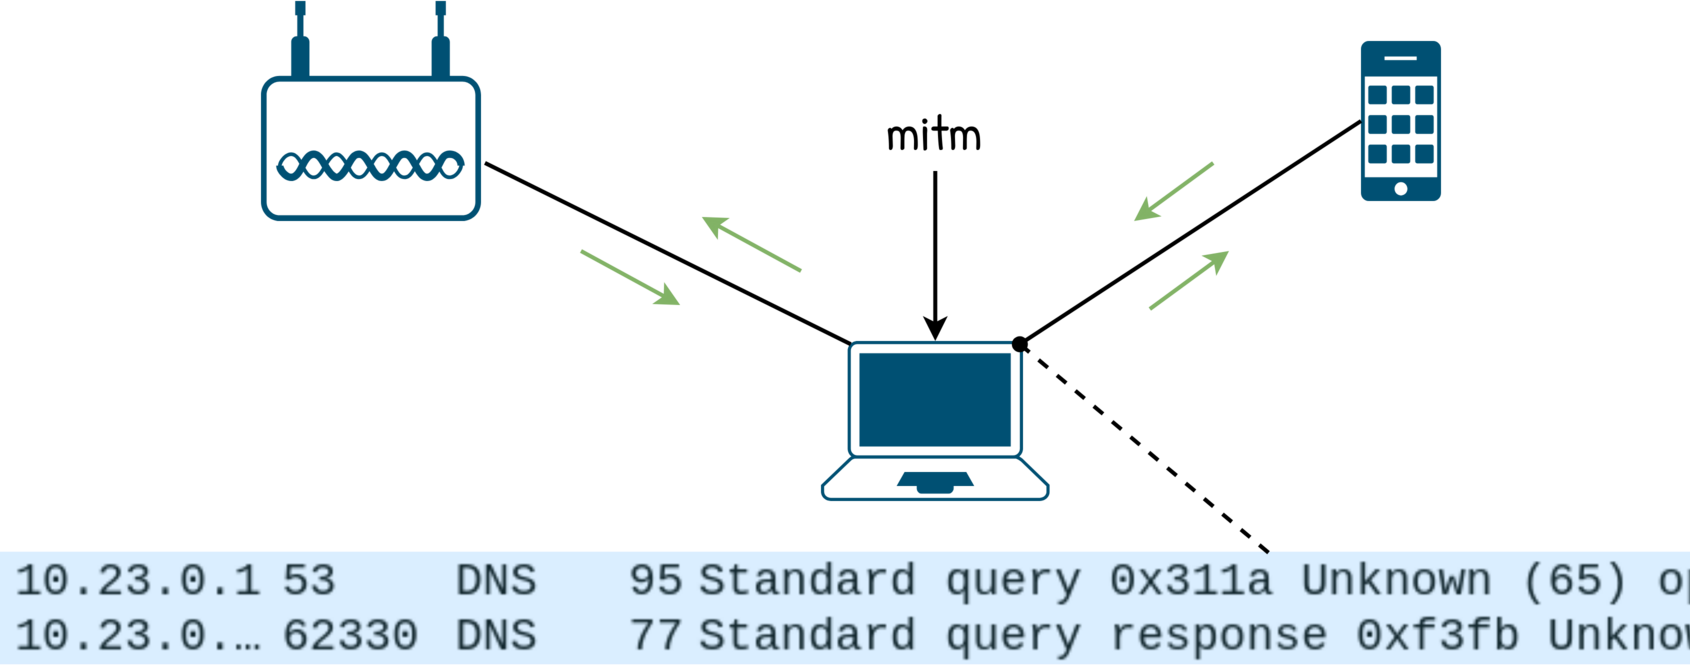
So we want two things:
- reject any DNS request unless it is sent to our
dnsmasq(the target will receive ICMP destination unreachable) - drop any DNS request directed to our
dnsmasqthat it is neitherAnorAAAAtypes (just we are not responding to those queries)
The reject is just a matter of adding a firewall rule:
Alternatively you could redirect the packets to dnsmasq instead of rejecting them.
$ iptables -A FORWARD -s 10.23.0.0/24 -p udp --dport 53 -i apmitm -j REJECT
The drop is much trickier: dnsmasq does not have a way to block these types of queries and iptables works only at the L3 layer and it doesn’t know how to parse DNS.
Luckily, we can delegate the accept/reject/drop decision to an user application with nfqueue.
$ iptables -A INPUT -s 10.23.0.0/24 -p udp --dport 53 -j NFQUEUE --queue-num 1
Now we need to run a program that reads from that queue and decide if the UDP packet is accepted or dropped.
The handle function takes a packet nf object and builds a scapy IP. Then, if it is a DNS query and all the questions are of type A or AAAA, accept the packet; otherwise drop it.
To get these nf packets from the queue created by iptables, we use the NetfilterQueue wrapper: we bind to the handle function to the queue and we create and run a UNIX socket.
To make it run you need to install dev libraries build-essential, python3-dev and libnetfilter-queue-dev (with apt-get) and then install the Python packages NetfilterQueue and scapy (with pip)
Then run the script as root.
from netfilterqueue import NetfilterQueue
import socket
from scapy.all import *

def handle(nfpkt):
    pkt = IP(nfpkt.get_payload())

    # Check if it's a DNS query packet (qr=0)
    if DNS in pkt and pkt[DNS].qr == 0:
        queries = pkt[DNS].qd

        for query in queries:
            # Check for A (IPv4) and AAAA (IPv6)
            if query.qtype != 1 and query.qtype != 28:
                nfpkt.drop()
                return

        nfpkt.accept()
        return True

    nfpkt.drop()
    return


nfqueue = NetfilterQueue()
nfqueue.bind(1, handle)
s = socket.fromfd(nfqueue.get_fd(), socket.AF_UNIX, socket.SOCK_STREAM)
try:
    nfqueue.run_socket(s)
except KeyboardInterrupt:
    pass
finally:
    s.close()
    nfqueue.unbind()
Finally thoughts
I didn’t explore how to trick the target to connect us instead the access point. It has its little tricks but for this post was too much.
dnsmasq really made everything easy but it falls short when we need to handle and customize how we want to responde to each DNS query. We cast some iptables spells but clearly dnsmasq is not designed for this use case.
Nevertheless it was an opportunity to play with NFQUEUE.
And on top of all of that: sniff, always work with wireshark open on both interfaces. Not only gives you insight of what is happening or why it is not working, but also you may found things that you never thought before.
Related tags: hostapd, dnsmasq, iptables, route, ap, wifi, mitm

